
The recent release of RAD Studio 10.3.2 includes being able to compile your apps for macOS 64-bit, and allows you to notarize your apps right from the IDE. In this article, I cover the notarization process from end to end.
What is Notarization?
Notarization is the process of "signing" your macOS application so that you can distribute it via means other than the Mac App Store. Starting from macOS 10.15 (Catalina), all apps that run on the Mac need to be notarized, or be distributed via the Mac App Store, otherwise they simply will not be allowed to run.
If you're interested in more information about how notarization is applied, please watch this video from WWDC 2019. (runs approx 33 mins)
In order to notarize your macOS application, you need to have an Apple Developer Account so that you can obtain a Developer ID Certificate, and an application specific password.
Obtaining a Developer ID Certificate
Given that you have an Apple Developer Account, there are two ways to obtain a Developer ID Certificate. One is substantially more straightforward, especially if you have already set up your developer account in Xcode:
Via Xcode:
- Start Xcode, click on Preferences, and select the Accounts tab:
- Select the developer account you wish to create a Developer ID Certificate for
- Click Manage Certificates

- Click the "+" dropdown button in the bottom left
- Click Developer ID Certificate.


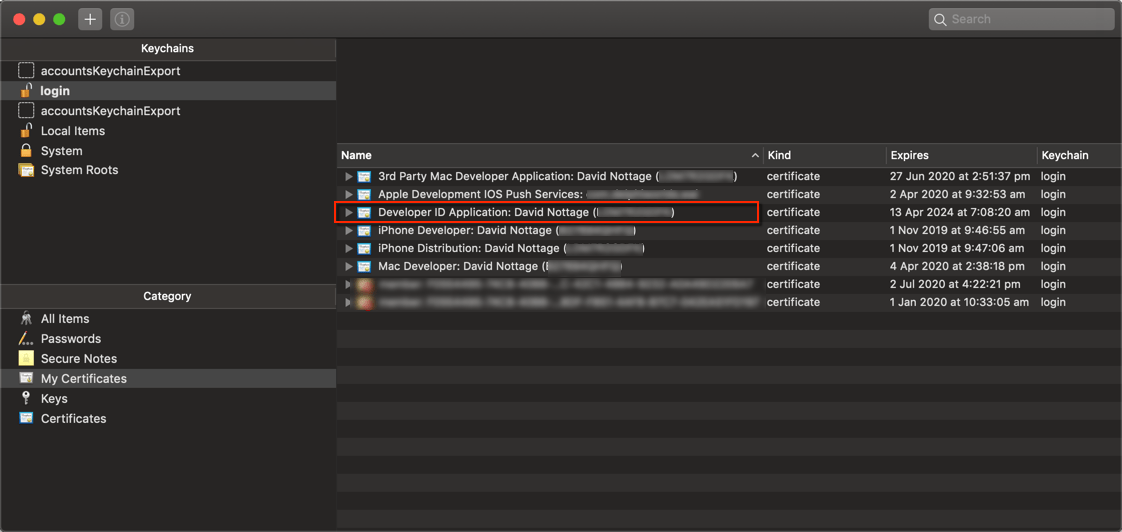
That's it! Xcode generates the certificate for you, and adds it to the Keychain. If you open the Keychain Access app (in /Applications/Utilities), you should see the certificate there:
Via the Apple Developer website:
The alternative is to go to https://developer.apple.com and log in using your developer account Apple ID, select Certificates, IDs and Profiles, click the plus button:

..select the "Developer ID Application" option, and follow the instructions. I won't go into any further detail for this process, as it is really much, much easier to do it via Xcode.
Obtaining an application specific password
Please follow the instructions for an application specific password, here.
The website to visit to create the password is here, using your developer account Apple ID to log in
Providing the notarization details in Project Options
- In Delphi, open your application, and bring up the Project Options
- In the list on the left, select Deployment -> Provisioning
- In the Target combobox, select macOS 64-bit for the highest configuration for which you wish to apply the settings e.g. "All configurations" if you wish to apply the settings to all configurations
- In the Build Type combobox, select: macOS 64-bit Developer ID
- Enter the Apple ID you used to create the application specific password in the Apple ID edit
- Enter the application specific password you created earlier (you did remember to save it somewhere, yes?) in the App-specific Password edit
- In the Developer ID Application Certificate edit, enter the full description for the Developer ID Certificate you created earlier, e.g: Developer ID Application: Joe Smith (JHF5SD7N)
- If you wish to have the process staple the notarization ticket to your app, check the "Attach a ticket…" checkbox. This is recommended, otherwise macOS needs to check-in with Apple servers to see if it's okay to run, which requires an internet connection.

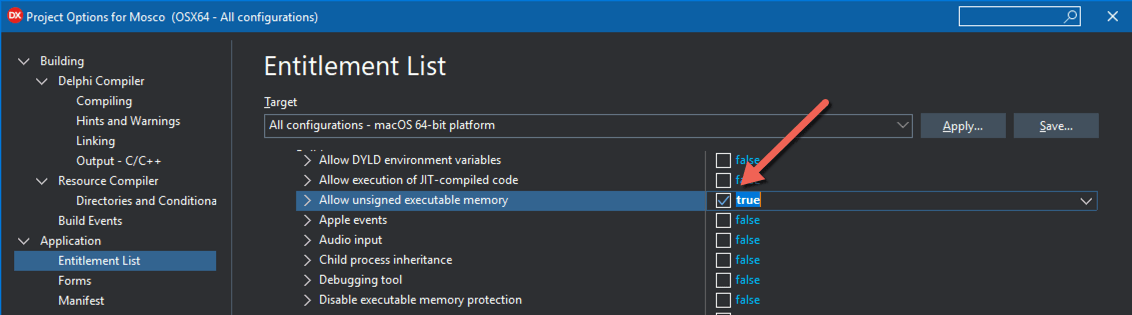
- In the list on the left, select Application -> Entitlement List
- As per step 3, select the applicable Target
- Check the "Allow unsigned executable memory" option. In later versions of Delphi, this will be set by default.


Notarizing the application
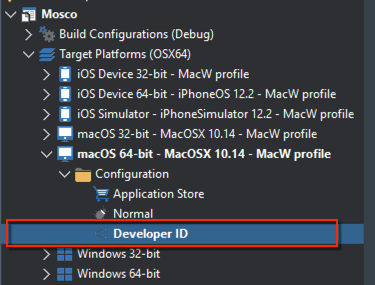
- Select the Developer ID build type in the Project Manager, e.g:

- Deploy the application:


Delphi will do all the necessary steps to notarize your application. The notarization step can take a couple of minutes, depending on how busy Apple's servers are. It will take a further couple of minutes or so while the IDE waits for the notarization status to be updated.
If there are issues during the notarization process, it may be helpful to turn on the verbose setting in PAServer:

As it outputs all the commands and results, which may be helpful in diagnosing the problem(s).
I hope this helps clarify the notarization process, at least until more complete documentation is available on the RAD Studio docwiki.


Hi Dave, my macOS app does need access to our internet server.
As soon as Delphi is setup to notarize, the app throws AV and stops with the console message “Could not load SSL”.
I found out that when using SSL, Delphi refers to libcryto.dylib and libssl.dylib – both deprecated by Apple – maybe that’s the reason for the AV..
Is there a way to use SSL access in notarized apps with Delphi 10.3 Rio?
Hi Victor,
I assume you mean that you are trying to run the app that has been notarized?
Are you using Indy in your application? If so, are you using dylibs that have 64-bit code, and are you deploying them correctly? If you are using the native HTTP components, it should “just work” because it does not rely on you deploying any extra dylibs.
Hi, your info is clear but does not work for me. I get the error that my Apple ID access is attached to other iTunes providers. Apparently I should add the -itc_provider option to the altool-command. Any idea how to solve this?
Hi Wim,
Unfortunately, it looks like the IDE is presently not capable of handling this situation. You may have to either create another Apple ID, or perform the notarization manually from the command line so that you can include the extra parameter. There is some information here about how to do that:
https://developer.apple.com/documentation/security/notarizing_your_app_before_distribution?language=objc
If I have time, I’ll come up with a condensed version of this to make it easier.
Regardless, you should file a report in QP:
http://quality.embarcadero.com
Please ensure that you include exact error messages.
Hi Dave,
i notarized a 64bit app that is used also to record audio. The file “AppName.Entitlements” contains the key
com.apple.security.device.audio-input
When running the app for the first time (or later) on Catalina it doesn’t ask for permission to access the microphone. The actual recording of audio works fine, as it writes the wave file as it should but it contains only silence.
Do you happen to know what has to be done to force macOS to ask for permissions and then grant the access to the microphone?
Thanks,
Victor
What is the difference between complicating how MacOS 64bit Developer ID for MacOS Normal without informing Apple ID and specific password. I even tried to create a pkg of the application that was created in the parserve folder of the normal option without success.
Please read the first section of the article starting with “What is Notarization?” regarding the difference between notarized and “normal”.
Notarization does not create a “pkg” file – that is a separate process. There are some apps that will do this for you, or you could just use the pkgbuild command: https://www.manpagez.com/man/1/pkgbuild/
[…] Developer ID certificate using Xcode or Apple Developer site. (as well described on https://delphiworlds.com/2019/07/notarizing-your-macos-64-bit-apps-built-with-delphi/ […]